Laser Engraving or Etching vs. Stain Marking vs. Ablation: What's the Difference?
The terms get used interchangeably, but they describe three distinct processes with different...
Let me qualify this post by first stating that I am not a metallurgist so please don't pick me apart if I state something with incorrect technical details. I want to address the subject of color laser marking more from a practical and setup standpoint rather than a theoretical standpoint.
 If your interest is the science behind color laser marking, go to this link and enjoy yourself. I am not the author of the article in the link.
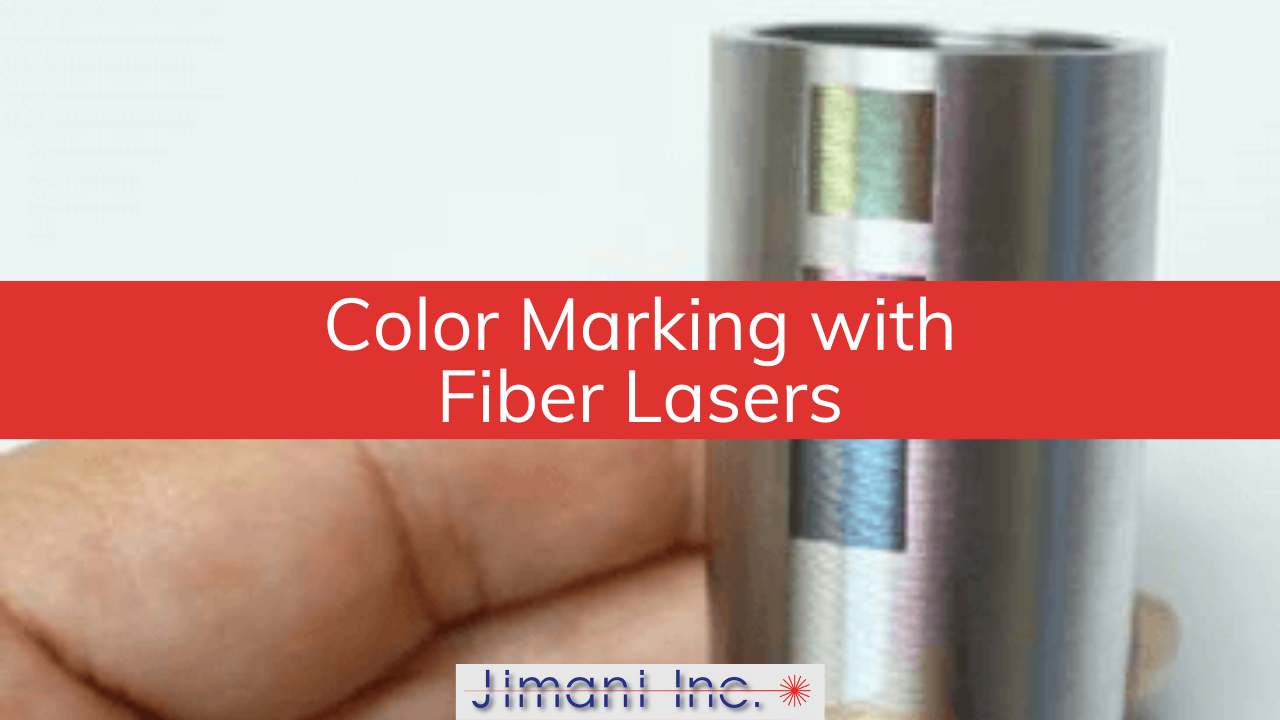
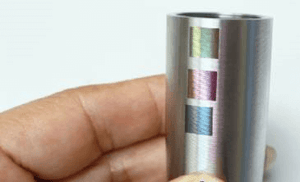
A laser mark on metal which is permanent, has a distinct color change and is non-penetrating is frequently referred to as an "anneal mark" and this is incorrect. This process really consists of heating the surface of the material so that an oxide layer is formed and, depending on the thickness of the oxide layer, visible light is reflected differently and gives the appearance of colors. At Jimani, we refer to this type of mark as a "stain mark".
Grey, dark brown and black stain marks are the most common and easiest to achieve. Stain marking can be accomplished on stainless steel, titanium, and chrome. Different grades of stainless will yield different results and titanium seems to provide the largest and easiest to achieve range of colors.
Since stain marking is only heating the surface of the material, not vaporizing material from the surface, the focused spot size of the laser beam is very important. A very small focused spot creates too much laser power density and material is vaporized from the surface of the part, hence the term "laser engraving".
The most common technique for increasing the size of the focused laser spot is to simply move the lens up or down so that it is slightly out of focus on the work. This technique might work well on flat surfaces but it doesn't work very well when trying to stain mark around the radius of a round part. As the beam moves around the radius, it either goes back into focus and vaporizes material or goes further out of focus and doesn't heat the surface well enough to get a uniform stain mark.
Ideally, a radiused part should be marked at the focal point of the lens so that one can mark as far around the part as the depth of focus of the lens allows. There is no depth of focus if the part is already out of focus. At Jimani, we use an inverted beam expander to increase the size of the focused laser spot while still keeping the work at the focal point of the lens. It works pretty darned well.
Another important consideration for stain marking is the pulse frequency of the laser. Peak power of each focused laser pulse decreases as pulse frequency increases. Since the goal of stain marking is to heat the surface rather than vaporize it, lower peak powers and higher pulse frequencies tend to generate more heat on the surface of the part rather than engrave into it.
Some fiber laser units allow for the pulse width of the laser pulses to be changed.
By making the pulse width longer or shorter, one can control the amount of heat on the surface of the part. By making small changes in pulse frequency and pulse width, the thickness of the oxide layer in the stain mark can be varied and those discreet changes in the oxide thickness result in color differences in the eye of the viewer.
If you would like to discuss color laser marking with fiber lasers please feel free to contact us.