Laser Engraving Brass Nameplates
Industry: Nameplate
One of the new buzz words being used regarding capabilities of laser marking systems is 2 ½ D laser engraving. So, what is 2 ½ D laser engraving and how does it differ from 3D laser engraving? I don’t claim to be an expert in this area but here is what I know. These comments all apply to galvo driven marking systems.
If a cylinder, for example, was placed under the center of the focusing lens in a galvo driven laser marking system, only the top half, or 180 degrees of that cylinder, is visible to the lens. Unless the cylinder was very small, one could not mark or engrave around the full 180 degrees visible to the lens because the laser beam would go out of focus as it tried to wrap around the cylinder. The depth of focus of the lens would be exceeded. The rule of thumb that I use is that one can generally mark about 60 degrees around the radius of a 1 inch diameter cylinder without moving the cylinder or the focal point of the lens and stay within the depth of focus of the lens.
If a 3rd galvo axis is connected to a lens that is in the beam path and the laser marking software is capable of accepting Z axis positioning information and can control the 3rd galvo, then the focal point of the laser can be changed as the galvos try to wrap the marking around the cylinder. This technique requires extra hardware and the software must be able to control that hardware and be capable of sending X,Y and Z positioning commands to the galvos. This is 3 D marking or engraving.
What if, instead of wanting to mark around a cylinder, one wanted to engrave a 3D bas-relief image on to the surface of a substrate. The face on the head of a coin is an example of a 3D bas-relief image on a substrate. A bas-relief image has no undercut and all surfaces to be engraved would be visible to the focusing lens of the laser marking system. Then, it becomes a matter of how the laser light is applied to the substrate being marked. Sections of the bas-relief image that should be more deeply engraved must have more laser passes applied to them than the raised sections of the image.
A bas-relief STL file, such as might be used on a 3D printer, contains all of the X, Y and Z information to create a 3D bas-relief image. If that bas-relief STL file could be converted into a file format that could be used by a galvo driven laser marker and if the deepest relieved portions of the image did not exceed the depth of focus of the marker’s optical system, that image could be engraved without making any changes to the Z axis position of the lens. The technique of engraving a bas-relief image on a substrate without changing the focal point of the optical system is called 2 ½ D engraving.
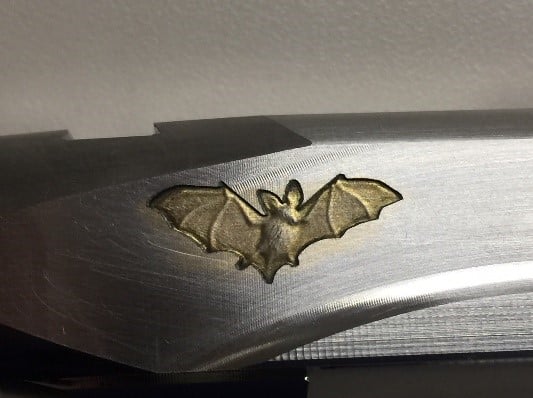
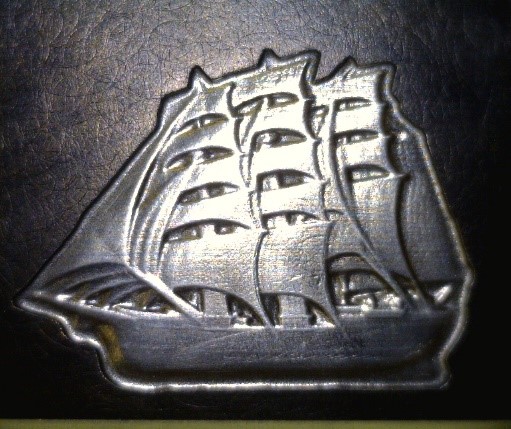
I’m not a software guy and I don’t want to be one and so for a few months I have been trying to convince Keith Cudebec of American Laserware the value of a 2 ½ D engraving feature and coax him into investigating what it would take to convert a bas-relief 3D STL file into something that could be marked with a galvo driven laser, such as a PLT file. Well, Keith took my coaxing to heart and he has created the Laser Sculpture software application that does just that. For the last month or so Keith has been sending BETA versions to Jimani for testing and we’ve been giving feedback to him about our results. About a week ago, Keith finally released a version of Laser Sculpture software and has made it available for sale on his website at http://www.laserware.com/downloads/ . We have a production copy of the software here at Jimani and I’m spending a lot of time converting STL files into PLT files and trying to understand the settings that provide the best looking engraved images. Since I have no experience creating bas-relief STL files, I have been relying on the Internet to find and purchase appropriate STL files. The challenge I have run in to is that many of the STL files available for purchase don’t seem to have enough relief to make the image “pop” on an engraved piece of metal. Below are a couple of photos of STL files that have enough relief to show promise although I won’t say that I’m an expert at 2 ½ D engraving yet. I feel pretty much like a beginner.
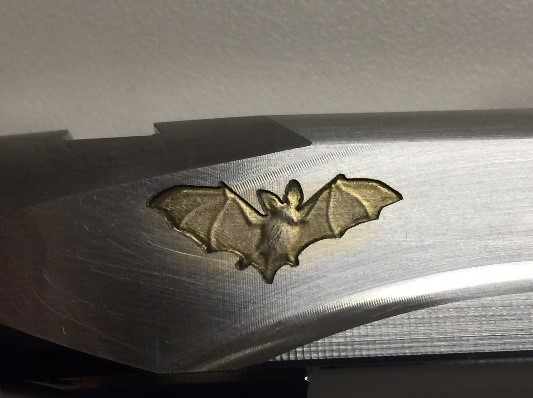
The bat was engraved on a piece of stainless steel and is 0.4 inches high. The engraving is about 0.015 inches deep at the deepest points.
The clipper ship was engraved on a piece of black anodized aluminum and is 1 inch high. The engraving is about 0.060 inches deep at the deepest points.
Both images were buffed with a Dremel tool after engraving. I’m curently playing with paint fill techniques with the intent of trapping a dark fill paint into the deepest engraved areas to enhance the 3D appearance of the engraving. I’m not really an “artsy” type guy and any comments or suggestions from readers about post marking “tricks” to improve the appearance of the engraved image would be appreciated.
If there is any interest in playing with Laser sculpture, know that it will work on any laser marking software, including all versions of Prolase, that will accept and process a PLT file. A demo version can be downloaded from the American Laserware web site. The demo version is good for a limited number of days and a limited number of STL to PLT conversions. The word DEMO gets engraved by the laser in the middle of the image. After the trial period, the software becomes non-functional until purchased. It must be purchased online from American Laserware. Jimani has nothing to do with selling or supporting the Laser Sculpture software.
My hope is that more people start using this and that there will be a willingness to share information about how to achieve best results.